 |
 |
 |
Boiler Testing
|
At this relatively
early stage of
owning a Stafford steam locomotive the boiler has now been subjected to
the
two basic types of boiler test, namely the annual steam test and the
biennial hydraulic test.
These two tests are mandatory if the loco is to be covered by
any of
the insurance policies currently available in the UK to protect the
loco owner and any miniature railway society or club from claims
against them. The annual steam test is quite simple and is intended to demonstrate to the inspector that the boiler safety valve functions correctly, that the boiler water level gauge is operating, and that the boiler has two methods of being filled with water while in use. The biennial hydraulic test (every other year) is slightly more difficult to conduct, but is essentially simple in that it proves that the boiler does not leak or show signs of distortion when pressurised to 1.5 times its normal working pressure. For safety reasons this test is always conducted by completely filling the boiler and test system with water (no air which could compress is allowed to remain in the system) so that in the event of a catastrophic failure the pressure will instantly be lost without any compressed gas leading to an explosive failure. Most model clubs and societies have approved boiler inspectors available to conduct these tests for their members and they will also have the requisite calibrated test equipment. It is also worth pointing out that if you own a model fitted with a copper boiler (Stafford's have steel boilers) that the hydraulic test need only be conducted quadrennially e.g every fourth year. This page explains about each type of boiler test and describes how it has been conducted on my Stafford locomotive. NOTE: At the start of 2013 a new boiler test scheme, the "Written Scheme", was introduced to replace the one described on this page. If your boiler is being tested by your Club or Society boiler inspector it is most likely that they will be conducting the testing in accordance with the scheme administered jointly by, the Southern Federation of Model Engineering Societies, the Northern Association of Model Engineers, the Midland Federation of Model Engineers, the7¼" Gauge Society Limited, their insurance brokers and the underwriters (RSA). As a locomotive owner you will not see any real difference in the way your boiler is tested to that described below, however the documentation you receive will be different. Examples of the new "Written Scheme" documents are shown near the bottom of this page (click here to jump to them). |
|
| The Annual Steam Test. | |
 The
annual steam test consists of a series of simple demonstrations to show
that the boiler and its systems are in good working order and the
inspector will normally commence the tests once the boiler has reached
its normal operating pressure. Please don't forget that it is the loco owner's
responsibility to ensure that the fire and water levels are correctly
maintained throughout these tests. The
annual steam test consists of a series of simple demonstrations to show
that the boiler and its systems are in good working order and the
inspector will normally commence the tests once the boiler has reached
its normal operating pressure. Please don't forget that it is the loco owner's
responsibility to ensure that the fire and water levels are correctly
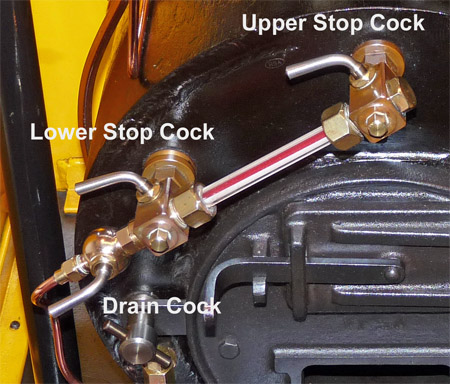
maintained throughout these tests.The normal order of the tests (in my 10 year experience of model steam engines) is described below. Safety Valve Test. With the boiler in its normal operating condition the inspector will ask for the steam blower to be turned fully on and then wait for the safety valve to operate. The safety valve will normally begin to operate just before the "red line" on the boiler pressure gauge is reached and the test has two objectives. The first is to show that the safety valve is operating at the correct boiler pressure, and the second is to show that even with the steam blower fully on the safety valve is able to stop the boiler pressure exceeding the "red line" pressure. The Stafford locomotives are fitted with an industrial Nabic "pop" safety valve and as the name implies it normally opens with a very loud pop and will remain open until the boiler pressure has dropped by about 20psi. As mentioned elsewhere on this website you really don't want to let the safety valve operate while waiting to load a bunch of children in the station. The loud pop (more like a small explosion) and subsequent hot shower bath (as the expelled hot water falls back to earth) will have children and adults alike jumping with shock and heading for cover ! So when conducting this test it is normally best to warn everyone in the vicinity of what is about to happen. Once the inspector is satisfied that the safety valve is operating correctly, and that it can prevent the boiler pressure rising more than 10% above the maximum working pressure with a bright fire and the steam blower operating, the blower can be shut off. Injector (and / or water pump) Tests. The insurance requirement for our model steam locomotives is that there must always be two independent means of getting water into the boiler when at its normal operating pressure. On the Stafford this means that both injectors must be working, but on other models the two methods may be an axle pump and an injector (or a hand pump and an injector, the options are many and varied). The inspector will expect the Stafford owner to demonstrate that both injectors are capable of feeding water into the boiler, and having just conducted the safety valve test the boiler will probably be requiring a refill of water to restore its correct level and to cool things down a bit as the fire will still be very hot after the prolonged use of the blower. Most boiler inspectors are very experienced engine drivers and they know that injectors may not start "first time every time", so they are only looking for proof that the injectors do operate and are filling the boiler. Providing that each injector operates and the water level in the boiler sight glass rises the test will be passed. Sight Glass Blowdown Test. This test is to confirm that the three control valves, or cocks, on the boiler water level sight glass operate correctly. With the boiler water at its normal level and the boiler at normal operating pressure the upper stop cock is shut to isolate the top of the sight glass from the boiler and then the drain cock is opened. The water level in the sight glass should drop quickly so that no water is visible in the sight glass and boiling water / steam should blast from the drain pipe. When the drain cock is closed again the water level should quickly return to normal in the sight glass. The upper stop cock is then reopened and the lower stop cock shut. When the drain cock is opened the water in the sight glass should disappear again, but this time when the drain cock is shut the water should not reappear in the sight glass until the lower stop cock is opened again. This sequence of tests proves that all three cocks are operating correctly and not leaking. 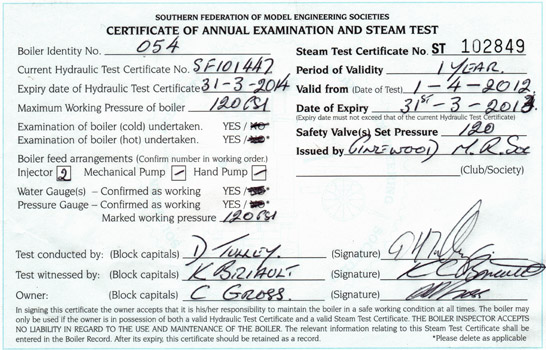 General Inspection. General Inspection.Throughout these steam tests the boiler inspector will be looking at the boiler and its associated control, gauges, and steam pipes to confirm that there are no signs of leakage and that everything is in satisfactory working order. Small weeps are not uncommon on the sight glass or control valves, but the inspector could fail the annual steam test if he considered something to be detrimental to the safe operation of the boiler. So before submitting your loco for its annual steam test it is well worth making sure that you are confident that everything is operating correctly. Certification. If all has gone to plan the loco should pass its annual steam test and the boiler inspector will be able to issue a new test certificate. The example on the right is from the Southern Federation of Model Engineering Societies which is the most common "governing" body for model steam clubs and societies in the South of the UK. There is also a Northern Federation, and if you do not belong to any club or society you could get your inspection done by any number of commercial boiler testers. As an individual you could choose not to have your boiler tested, but it is highly unlikely that you would be permitted to run your loco at any club or society track as they will always ask to see your current boiler test certificates before allowing you to fire up your loco. |
|
| The Hydraulic Test. | |
 Note that In order to complete
the boiler's hydraulic test
certificate the boiler inspector will ask you the capacity of the
boiler, and in the case of the Stafford this is 20 litres or 164 Bar
Litres. Note that In order to complete
the boiler's hydraulic test
certificate the boiler inspector will ask you the capacity of the
boiler, and in the case of the Stafford this is 20 litres or 164 Bar
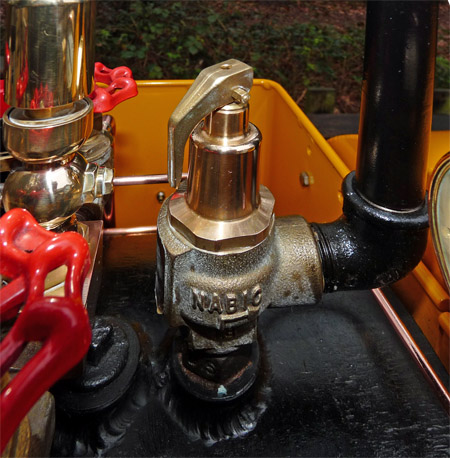
Litres. As mentioned at the start of this page the Stafford's boiler will require a hydraulic test every second year (or every four years if you have a different type of model fitted with a copper boiler). The test will pressurise the boiler to 1.5 times its normal maximum operating pressure and then look for any leakage from the boiler or any signs of physical distortion of the boiler. In the case of the Stafford this means that we need to find a way of stopping the boiler and its fittings leaking when held at a pressure of 180 psi for a duration of ten minutes. NOTE: The text below relates to Staffords fitted with the NABIC style of safety valve shown in the photo on the left. If you have a Feldbahn (or Stafford fitted with the newer soft pop type safety valve) please read the text below but also see the Feldbahn section at the bottom of the page (click here to jump to it). The first problem is the safety valve because it is designed to open and release the boiler pressure at 120 psi, which is well below the required test pressure. On many models it is easy to remove the safety valve as it is simply screwed into the top of the boiler and can be replaced with a simple blanking plug or the connection for the hydraulic test set. However on the Stafford the design of the safety valve and its outlet pipe makes removal rather difficult because the assembly cannot be rotated past the steam manifold. After some head scratching at my local society we devised this solution. 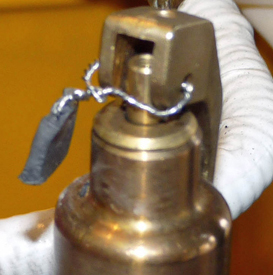 As
supplied the safety valve had a lead seal attached as shown in the
photo
on the right, but the thin wire had broken within a few months of
buying the loco. The photo on the left shows the replacement
8BA
brass bolt and nuts that now retain the lever that can be used to
manually open the safety valve. To conduct the hydraulic test
the
polished top section of the safety valve was unscrewed from the main
body which removed the working parts of the valve. This is
still
not easy as access for a spanner is tight, and before the next
hydraulic test I shall probably make a suitable box spanner to fit the
safety valve. The 8BA bolt was then removed so that the
working
parts of the safety valve could be removed (as a single assembly) from
inside the top section. A 5/8" diameter ball bearing was then
placed into the seat of the safety valve main body and a 39mm long
piece of 1/2" diameter x 16 swg wall brass tube was balanced on top of
the
ball. When the safety valve top cap is screwed back into
place the
tube will hold the ball bearing in position on the valve seat and seal
off the safety valve. As
supplied the safety valve had a lead seal attached as shown in the
photo
on the right, but the thin wire had broken within a few months of
buying the loco. The photo on the left shows the replacement
8BA
brass bolt and nuts that now retain the lever that can be used to
manually open the safety valve. To conduct the hydraulic test
the
polished top section of the safety valve was unscrewed from the main
body which removed the working parts of the valve. This is
still
not easy as access for a spanner is tight, and before the next
hydraulic test I shall probably make a suitable box spanner to fit the
safety valve. The 8BA bolt was then removed so that the
working
parts of the safety valve could be removed (as a single assembly) from
inside the top section. A 5/8" diameter ball bearing was then
placed into the seat of the safety valve main body and a 39mm long
piece of 1/2" diameter x 16 swg wall brass tube was balanced on top of
the
ball. When the safety valve top cap is screwed back into
place the
tube will hold the ball bearing in position on the valve seat and seal
off the safety valve.The next problems arose with the steam control valves. Station Road Steam had previously advised me that they could simply be closed when conducting the hydraulic test, but when we applied the 180 psi test pressure they all started to pass water with the result that it was difficult to maintain the test pressure and the smoke box filled with water via the blower pipe. On my engine at least it is necessary to make and fit blanking plugs to the outlet side of all four steam control valves. The final things you require are to disconnect the steam pressure gauge and to connect the hydraulic test set to the boiler. I chose to use the pressure gauge steam manifold connector as the point for connecting the hydraulic test set so both actions occurred at the same time. Although many boiler testers will have a box full of adaptors it is best to supply your own so that you know that it will not have been lost on the day you need it. Just make sure before the test day that your adaptor will fit the inspectors test equipment. 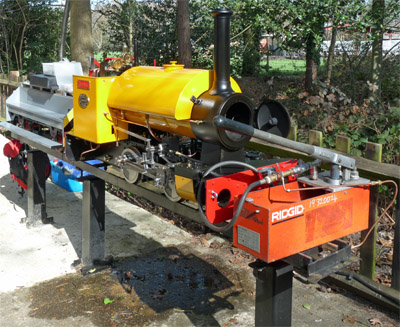 The
boiler now requires to completely filled with water to leave no air in
the system before the hydraulic test set is connected. The
reason
for this is that water does not compress unlike air. If a
boiler
was tested using air pressure and it failed catastrophically it would
literally explode (like a balloon but much worse). It it
fails
when full of water under pressure, as soon as the water starts to
escape the pressure is instantly lost and no explosion occurs.
This is a critical safety feature and why boilers are always
tested hydraulically. The
boiler now requires to completely filled with water to leave no air in
the system before the hydraulic test set is connected. The
reason
for this is that water does not compress unlike air. If a
boiler
was tested using air pressure and it failed catastrophically it would
literally explode (like a balloon but much worse). It it
fails
when full of water under pressure, as soon as the water starts to
escape the pressure is instantly lost and no explosion occurs.
This is a critical safety feature and why boilers are always
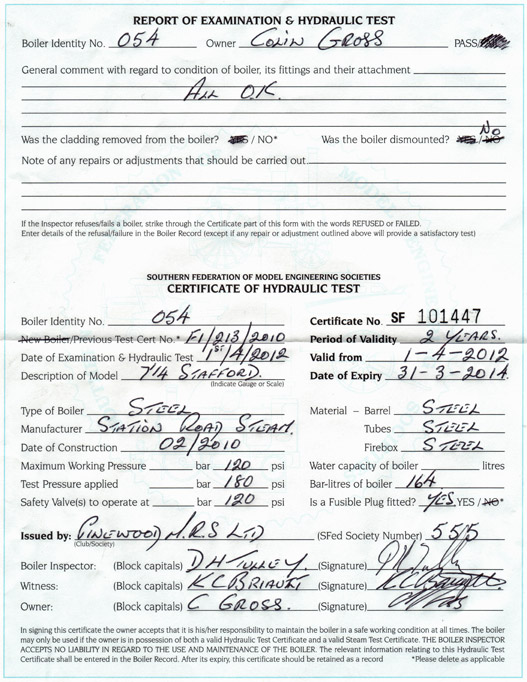
tested hydraulically.Before pressurising the boiler make sure that everywhere is dry as it is easy to spill water when filling the system and the inspector needs to be able to see if any water is leaking during the test. The boiler can now be pressurised, and the test will require the test pressure (180 psi for a Stafford) to be maintained for ten minutes without any leakage occurring. In practice some very minor leaks can be tolerated from the sight glass or steam valve seals as the test is explicitly for the boiler and not the control valves etc, so the inspector may use the hydraulic pump to maintain the test pressure. The test will concentrate on looking for leaks from the boiler, with special interest applied to examining the joints between the fire tubes and the boiler plates in the fire and smoke boxes as the tubes are simply expanded into position and do not have welded joints. The photo on the left shows my Stafford with the hydraulic test rig being setup ready for use. Once the hydraulic test of the boiler has been completed the final stage of the hydraulic test is to use the test set to verify the accuracy of the Stafford's steam pressure gauge. This will require you to have another adaptor to connect the test equipment to your locos pressure gauge. The inspector will also be checking to make sure that the loco pressure gauge has a prominent red mark at the boilers maximum working pressure (120 psi for the Stafford). If all goes well the test will be passed and the boiler can be reverted to its normal configuration, with the excess water being drained out of the blowdown valve. The annual steam test can then be conducted as the two will normally be required at the same time every second year for the Stafford). A typical hydraulic test certificate is shown below left. |
|
 |
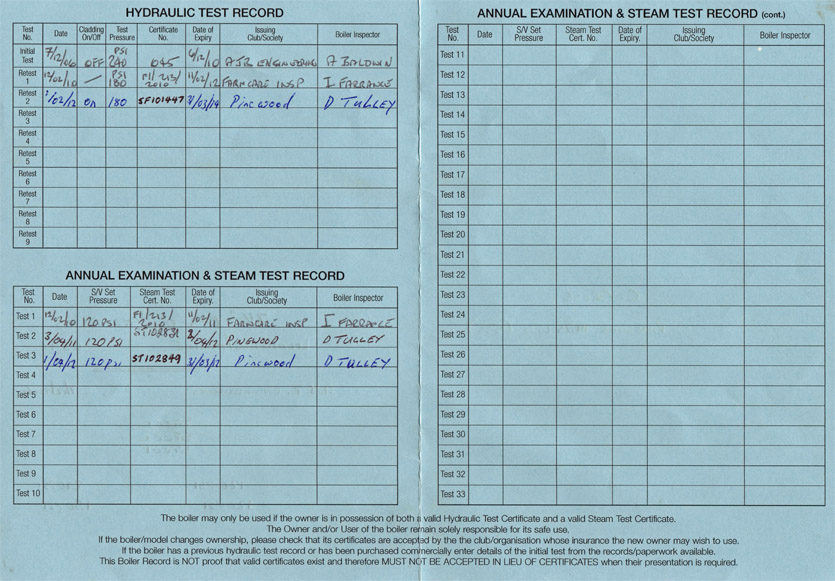 Hopefully your boiler testing will all go smoothly and you obtain the two test certificates you require, so all that remains is to enter the test information into the Stafford's "Log Book", in my case a Southern Federation of Model Engineering Societies blue log book as shown on the left. This log book always accompanies the model throughout its life and shows that the locomotive has completed the necessary tests to show that it is safe to operate. It is these three documents that club officials will ask to inspect before they allow you to fire up and operate your Stafford on their site. Note: As with so many formal documents these only prove that the boiler was in a satisfactory condition on the day of the test. It is you, the loco owner, who is responsible for ensuring that the complete boiler system remains in satisfactory working order. |
| The "Written Test" scheme. | |
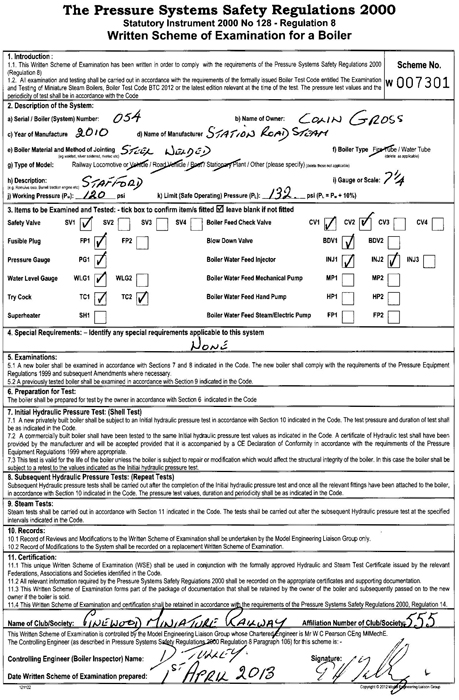 |
The boiler, regardless of whether or not it already has the Blue Log Book shown above will be issued with a copy of the document shown on the left. This "Written Scheme" will need to be replaced if: - a) the boiler changes hands when a new Written Scheme in the name of the new owner is needed or b) the boiler has undergone major repairs or the working pressure has been altered when a new "Written Scheme" is needed. The boiler owner/user should safely keep the Written Scheme with the other boiler paperwork. The boiler owner / user does not need to carry the "Written Scheme" certificate about in the same way as the Boiler Certificate is carried about. |
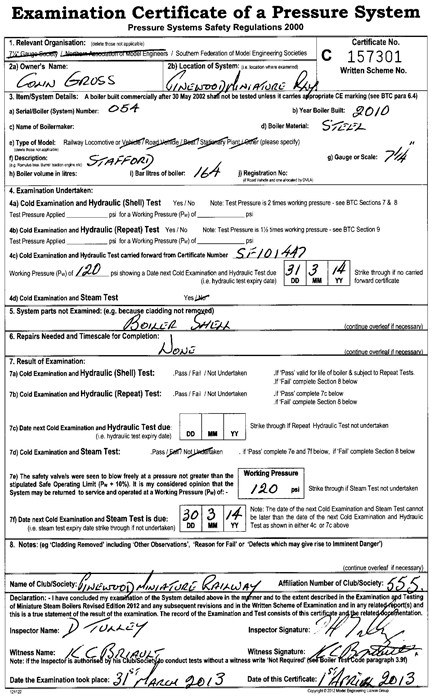 |
As of January 2013 the two certificates shown above on this page have been replaced with the certificate shown on the left. This certificate is the one that you will need to show the club or society officials if you wish to operate your locomotive at any location other than your home club or society. |
| Hydraulic testing a Feldbahn (or Stafford with the soft pop type safety valve). | |
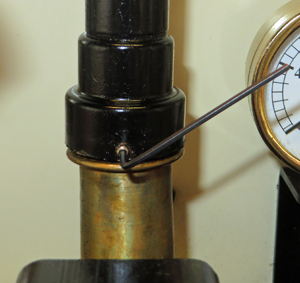 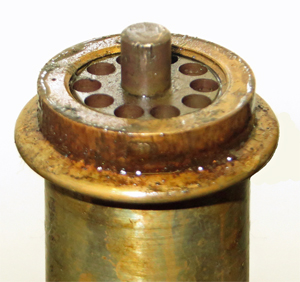 The
soft pop style of safety valve fitted to Feldbahns (or later Staffords)
makes conducting the hydraulic boiler test much easier because its
design makes it simple to keep it closed at the boiler hydraulic test
pressure. On a Feldbahn the first thing you need to do is to
remove the outlet extension pipe by using an Allen Key to loosen the
screw as shown in the photo on the left. Once slack, and assuming
that you haven't allowed it to become stuck in place by lack of
maintenance, you can lift the tube upwards and then remove it from the
locomotive to reveal the safety valve as shown on the right. The
soft pop style of safety valve fitted to Feldbahns (or later Staffords)
makes conducting the hydraulic boiler test much easier because its
design makes it simple to keep it closed at the boiler hydraulic test
pressure. On a Feldbahn the first thing you need to do is to
remove the outlet extension pipe by using an Allen Key to loosen the
screw as shown in the photo on the left. Once slack, and assuming
that you haven't allowed it to become stuck in place by lack of
maintenance, you can lift the tube upwards and then remove it from the
locomotive to reveal the safety valve as shown on the right.It's probably worth pointing out now a lesson I learnt the hard way during my Feldbahn's first period of over winter storage. This type of safety valve can, and in my case did, become stuck closed if it is not lubricated. I only found this out when I first steamed the engine after its winter break when the safety valve failed to lift. As the bright fire I had been using to raise steam caused the boiler pressure to keep rising the safety valve refused to open even at 160 psi. After injecting water to cool the boiler and lower the pressure I had to quickly remove the extension pipe and force the valve open by using pliers to "lift" the central rod that you can see in the right hand photo. After lubricating the valve with WD40 and a few cycles of raising and lowering the boiler pressure the safety valve began operating normally again but I had learnt the lesson and now remove the extension pipe and lubricate the valve with a small amount of WD40 after every run. PLEASE NOTE: If you have to attempt to "open" the safety valve using pliers while the boiler is pressurised take great care to keep well clear of the escaping steam OR YOU WILL BE BADLY SCALDED. | |
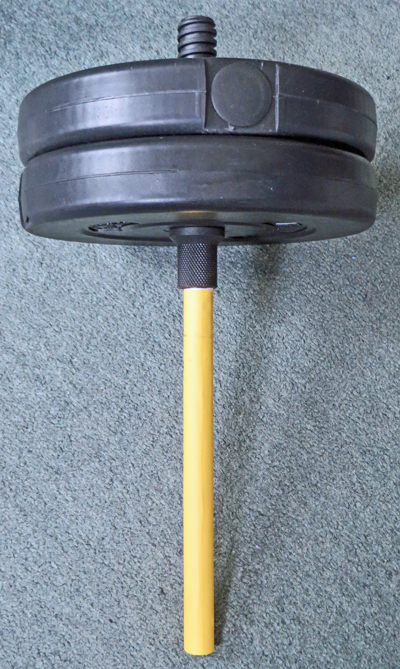 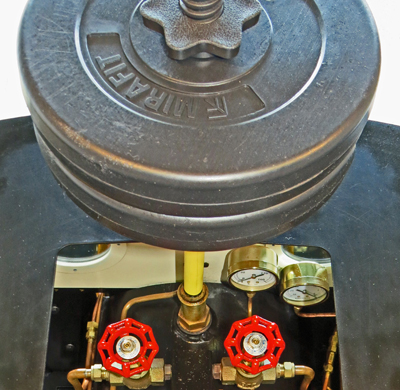 When
we first conducted the hydraulic test of my Feldbahns boiler we used
some scrap steel bar to create a weight that would stop the safety
valve from opening at the boiler test pressure of 180 psi.
Thankfully you don't need weights to retain the full 180 psi
because the safety valve's own spring will hold back 120 psi of
pressure so the weights need only hold back the additional 60 psi of
test pressure. Based on the diameter of the safety valve seat
this means that you need a weight of 8.8 lbs or 4 Kilos pressing down
on the safety valves centre pin. When
we first conducted the hydraulic test of my Feldbahns boiler we used
some scrap steel bar to create a weight that would stop the safety
valve from opening at the boiler test pressure of 180 psi.
Thankfully you don't need weights to retain the full 180 psi
because the safety valve's own spring will hold back 120 psi of
pressure so the weights need only hold back the additional 60 psi of
test pressure. Based on the diameter of the safety valve seat
this means that you need a weight of 8.8 lbs or 4 Kilos pressing down
on the safety valves centre pin.Now, to make my own test weight I looked at purchasing some suitable steel bar but that was far more expensive than purchasing a set of second hand dumbbell weights from eBay. All I used from the set was the centre bar and two 2.5 Kilo weights which gives 25% more weight than needed for the hydraulic test. The left hand photo shows how I stripped most of the plastic handle and one end's threaded section from the steel bar and then sleeved the exposed steel with some heat shrink tubing (mainly to improve the rough exposed steels cosmetic appearance). The lower end of the steel bar is drilled about 3mm deep to locate it over the safety valve centre pin during testing as shown in the right hand photo. During the hydraulic test the pipe between the steam manifold and the pressure gauge is removed so that the test equipment can be connected to the pressure gauge and boiler as required for the tests, and the weights prevent the safety valve from opening due to the 60 psi of over pressure required for the test process. Of course if you own a Stafford you will need to find another way of steadying the weights as your engine won't have the useful roof fitted to the Feldbahn but these weights are much easier to use than the alternative of removing the safety valve and blanking off the hole in the boiler. | |