 |
 |
Dummy Suspension Springs
| Before ordering my Stafford I had spent a considerable time looking at the prototype during its development when it appeared at the various Model Engineering exhibitions. I also had a long browse through the photos on the Station Road Steam website, but all the time I thought that there was something slightly "too open" about the gap between the top of the chassis and the underneath of the boiler. Then when looking at photos of full size engines on the Internet I realised that this space was often occupied by the locos leaf spring suspension; hence this cosmetic modification. | |
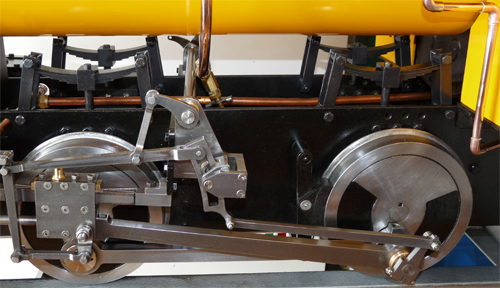  The
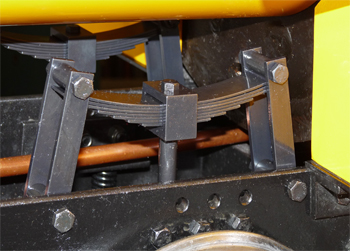
photo on the left shows the springs filling the otherwise "open" space
under the boiler, while that on the right shows a close up of a spring.
They are actually quite easy to make, although a little
tedious
due to the large number of repetitive parts involved. The
photo on the left shows the springs filling the otherwise "open" space
under the boiler, while that on the right shows a close up of a spring.
They are actually quite easy to make, although a little
tedious
due to the large number of repetitive parts involved.The leaves were rolled using a diminutive (and thus cheap) set of rolls from Chronos (see the links page) from 2 foot lengths of 3/4 inch x 1/16 inch mild steel flat, and then cut into the individual leaf lengths. The top leaf of each spring set was set into a groove cut across the turned bushes, and silver soldered into place on a jig so that it looked as if the leaf was rolled around the spring hanger. The more difficult part to make was the centre clamp as the hollow rectangle had to be jigged and silver soldered before being "trued up" using the 4 jaw chuck in the lathe. The centre post of each spring is simply bolted in place through all the leaves by the 2 BA bolt through the centre, and the whole assembly held to the chassis using M6 nuts and bolts. Incidentally the holes in the chassis were drilled using a normal electric hand drill and a simple angle iron jig to get all four sets of holes in the correct positions. Due to the large number of small parts involved, and the need to still be able to get the leaves through (and stacked inside) the centre clamp, none of the parts were painted. Instead they were all thoroughly cleaned with fine emery paper and then treated using Metal Black (see the links page). If you have never used it I can strongly recommend it for applying a black finish to steel parts. Putting all the parts through the four sequential pots of liquids takes some time, but the finish is very good and long lasting. For those of you who have CAD on your computer you can download my CAD drawing in .dwg format by right clicking on the link below and then saving the file on your computer. Please note that the drawing is predominantly metric and is drawn full size. Gentoo's Journals provides the drawing "for guidance only" and does not guarantee its accuracy or completeness. Right click here for the CAD .dwg file. |
|