 |
 |
Dumb Buffers
 Dumb
Buffers are the solid blocks of wood
often faced with a steel plate that many narrow gauge locomotives used
in
place of the sprung buffers commonly seen on mainline locomotives.
The dumb buffers on the full size Bagnall 'Sir Tom' are
unusual
because in the photo of the loco taken in the mid 1960's they were
painted with a chevron (safety warning) pattern. Looking at
photos of 'Sir Tom' and its sister 'Woto' at work in the B.I.C.C.
factory
it appears that the two locomotives spent most of their time pulling
special cable drum wagons using a rigid drawbar so the dumb buffers
could be painted with the warning chevrons because
they were not being used. This unusual
paint scheme was copied on my Stafford 'Gentoo', but the front buffers
are even more unusual in that each wooden block weighs about 6 1/2
Pounds (almost 3 Kilos). If anyone ever removes one of these
buffers they may be in for a shock when they feel its weight !
The reason for this is that both front dumb buffer blocks
have
been hollowed out and filled with lead so that they act as
counterbalances for the weight of the cab assembly which is all
additional weight fitted well behind the loco's rear wheels.
As I
didn't want the modified Stafford to end up "tail heavy" adding ballast
weight to the front of the loco seemed like a good idea and the dumb
buffers offered a simple way to hide the weight. Thankfully I
had
a lead block of exactly the right dimensions stored in my workshop that
had originally formed part of the ballast in a very unusual radio
controlled model CamShip
that I had built in the 1970's. All it required was cutting
in half to create the two lead blocks that I now needed. Dumb
Buffers are the solid blocks of wood
often faced with a steel plate that many narrow gauge locomotives used
in
place of the sprung buffers commonly seen on mainline locomotives.
The dumb buffers on the full size Bagnall 'Sir Tom' are
unusual
because in the photo of the loco taken in the mid 1960's they were
painted with a chevron (safety warning) pattern. Looking at
photos of 'Sir Tom' and its sister 'Woto' at work in the B.I.C.C.
factory
it appears that the two locomotives spent most of their time pulling
special cable drum wagons using a rigid drawbar so the dumb buffers
could be painted with the warning chevrons because
they were not being used. This unusual
paint scheme was copied on my Stafford 'Gentoo', but the front buffers
are even more unusual in that each wooden block weighs about 6 1/2
Pounds (almost 3 Kilos). If anyone ever removes one of these
buffers they may be in for a shock when they feel its weight !
The reason for this is that both front dumb buffer blocks
have
been hollowed out and filled with lead so that they act as
counterbalances for the weight of the cab assembly which is all
additional weight fitted well behind the loco's rear wheels.
As I
didn't want the modified Stafford to end up "tail heavy" adding ballast
weight to the front of the loco seemed like a good idea and the dumb
buffers offered a simple way to hide the weight. Thankfully I
had
a lead block of exactly the right dimensions stored in my workshop that
had originally formed part of the ballast in a very unusual radio
controlled model CamShip
that I had built in the 1970's. All it required was cutting
in half to create the two lead blocks that I now needed.Construction was quite simple although sourcing some of the components required a few hours of browsing the Internet. The wooden blocks came from my local timber yard, each 125mm length being cut from 4" x 3" (100mm x 75mm) planed timber. The fixings were too long to use normal coach bolts so instead I purchased M5 x 15mm coach bolts and lengthened them using M5 steel studding attached with M5 studding connectors. Studding connectors are common and easy to buy for M6 and bigger but in the end I managed to buy the M5 connectors from a ships chandlers (apparently they are used on yacht rigging). The coach bolts conveniently have a square shank to stop them rotating, so the steel buffer faces were laser cut from 4mm mild steel sheet to match the dimensions of the wooden buffer blocks. The square holes to suit the shanks of the coach bolts were also cut by the laser. An additional plate was also purchased with 5mm diameter holes in place of the square holes. This plate was then used as a drilling jig to ensure that the holes through the wooden blocks and Stafford buffer beams would all line up for final assembly. Ignoring the dumb buffers for a minute, the photo also shows how I "treat" minor damage to my Stafford. The paint on the buffer beams has received various digs and scrapes over the past two years (as have other parts of the loco), so to avoid trying to match the paint colour and touch in (or even worse do a complete component repaint) I clean the damaged area and paint it with Humbrol "rust" coloured paint. This stops any rust developing, and with a bit of "weathering" the result can be quite representative of a gently rusting area on a "real" loco. One day I will get around to a full repaint of the damaged components, but as with the full size locos I don't expect that to happen in the short term, it will probably be several years before things get so bad that a repaint is required. While this treatment may not be to everybody's taste I'm happy with it, and to me that is all that matters. |
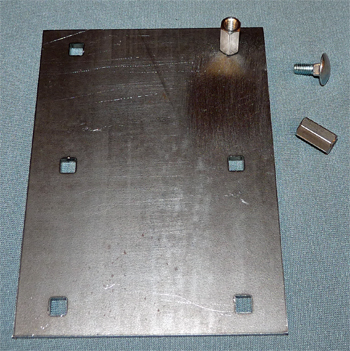  This
photo shows one of the laser cut steel buffer plates together with a M5
coach bolt and a studding connector. An assembled coach bolt
and
connector can be seen at the top right of the laser cut plate.
As seen in the photo the wooden blocks were drilled using the
jig
plate and then counter bored for the studding connectors.
Finally
the blocks for the front dumb buffers were chain drilled to remove
their centres to accommodate the lead blocks. Note that due
to
the thickness of the wooden blocks the holes had to be drilled from
both sides of the blocks and that to simplify the loco buffer drilling
only the four corners have M5 studding fitted (and thus holes drilled
in the wood) to mount the buffers. The centre two holes and
their
coach bolts were only cosmetic. This
photo shows one of the laser cut steel buffer plates together with a M5
coach bolt and a studding connector. An assembled coach bolt
and
connector can be seen at the top right of the laser cut plate.
As seen in the photo the wooden blocks were drilled using the
jig
plate and then counter bored for the studding connectors.
Finally
the blocks for the front dumb buffers were chain drilled to remove
their centres to accommodate the lead blocks. Note that due
to
the thickness of the wooden blocks the holes had to be drilled from
both sides of the blocks and that to simplify the loco buffer drilling
only the four corners have M5 studding fitted (and thus holes drilled
in the wood) to mount the buffers. The centre two holes and
their
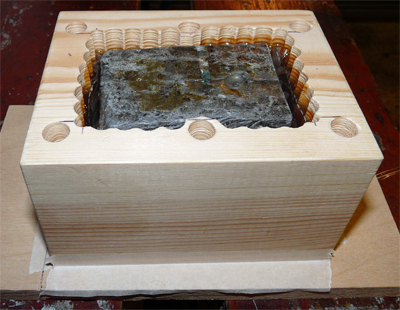
coach bolts were only cosmetic.To make the wooden blocks and their lead inserts into a solid assembly the void was filled with polyester resin (as normally used for moulding with glass fibre). The photo shows a block in the process of being filled with resin, but there are a few things to consider before attempting this as you need to stop the resin from leaking out of the void space as well as stopping it sticking the block to your workbench ! My solution is to stick a suitably sized piece of aluminium kitchen foil to the bottom of the block with masking tape, and to then stick the block onto a suitable flat surface with more masking tape. A couple of matchsticks were laid inside the void so that the base of the lead block would be above the bottom of the void, and then some resin was poured into the void. The lead block was then carefully lowered into the void and the resin topped up to completely fill the void. Once set the tape and foil can easily be removed and the blocks can be sanded, stained, and then varnished using quick drying matt varnish. |
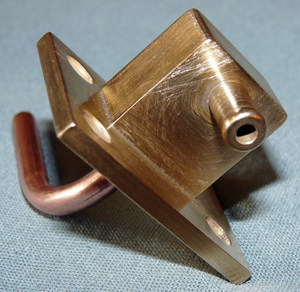 The
only problem with fitting the rear dumb buffers is that they cover the
position normally used on the Stafford for the vacuum brake pipe
connector. This photo shows my solution which mounts into the
side of the dumb buffer block as can be seen in the last photo on this
page. It was made from a length of copper pipe, a flat brass
mounting plate, and a brass block suitably turned to make the connector
spigot and drilled for the copper pipe. The whole assembly
was
silver soldered together and held by four brass countersink screws into
a recess cut into the wooden dumb buffer. The
only problem with fitting the rear dumb buffers is that they cover the
position normally used on the Stafford for the vacuum brake pipe
connector. This photo shows my solution which mounts into the
side of the dumb buffer block as can be seen in the last photo on this
page. It was made from a length of copper pipe, a flat brass
mounting plate, and a brass block suitably turned to make the connector
spigot and drilled for the copper pipe. The whole assembly
was
silver soldered together and held by four brass countersink screws into
a recess cut into the wooden dumb buffer. |
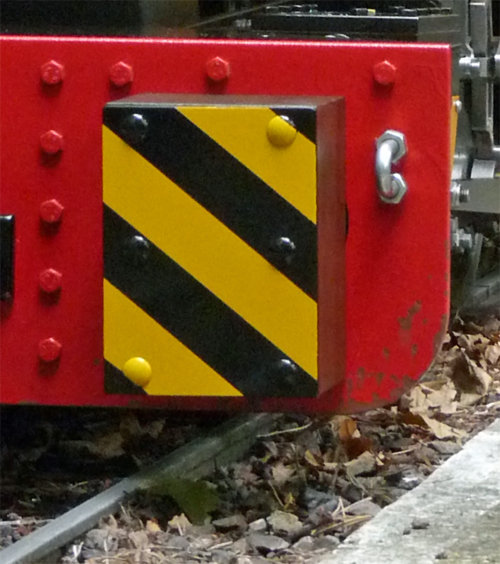
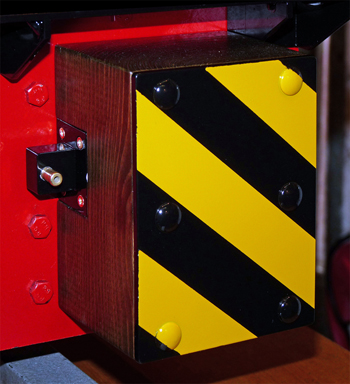 This
photo shows the rear dumb buffer fitted to the Stafford with the vacuum
brake pipe connector mounted in the side of the wooden block.
For
most loco owners the finished dumb buffers may simply be left as
unpainted (or maybe greased) steel because on most full size locos the
buffer would have actually been used as a buffer. On 'Sir
Tom'
and 'Woto' as previously explained the dumb buffers were generally not
used as buffers and so I chose to copy their chevron paint schemes.
The colour photos I have seen of the two locos in the B.I.C.C
works show rather tired and battered locos, but they still show that
the chevron had initially been painted black and yellow.
Curiously the yellow stripes had also been continued onto the
outside faces of the wooden dumb buffers, but only on the rear buffers
and not the front, so this is another part of the unusual colour scheme
now replicated on my Stafford. This
photo shows the rear dumb buffer fitted to the Stafford with the vacuum
brake pipe connector mounted in the side of the wooden block.
For
most loco owners the finished dumb buffers may simply be left as
unpainted (or maybe greased) steel because on most full size locos the
buffer would have actually been used as a buffer. On 'Sir
Tom'
and 'Woto' as previously explained the dumb buffers were generally not
used as buffers and so I chose to copy their chevron paint schemes.
The colour photos I have seen of the two locos in the B.I.C.C
works show rather tired and battered locos, but they still show that
the chevron had initially been painted black and yellow.
Curiously the yellow stripes had also been continued onto the
outside faces of the wooden dumb buffers, but only on the rear buffers
and not the front, so this is another part of the unusual colour scheme
now replicated on my Stafford.A final point to note is that the coach bolts I used (and probably many others) were bright zinc plated and passivated. This hard bright surface will not allow paint to adhere, so before painting the plating needs to be removed using something like Wet and Dry paper. I used aerosols to paint all the components; ACID 8 etch primer followed by Rustoleum RAL1007 (Gentoo's yellow colour) and Halfords gloss black. The worst part of this process was masking across the surface of the coach bolts, but the thin vinyl masking tape from the likes of Precision Paints does help considerably. |