 Although my
Stafford and Feldbahn had both primarily been used for pulling
passenger trains I had always wanted to build and own some wagons of my
own, so when I joined a society that did not conduct public running
that
desire had to be turned into a reality. My original idea was
to
build some simple wagons that could carry all the tools, cameras, lunch
boxes, etc. that always accompany me when running the Feldbahn but when
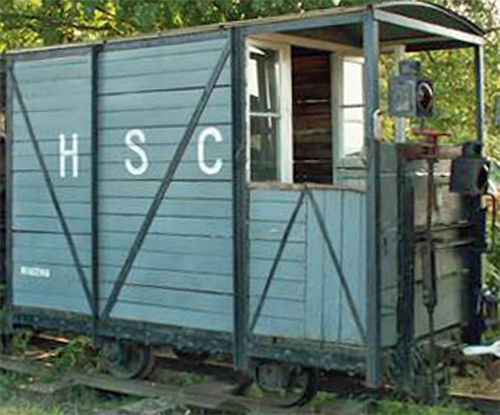
I saw this narrow gauge guards van at the Hollycombe Steam Museum I
changed my plans. Although my
Stafford and Feldbahn had both primarily been used for pulling
passenger trains I had always wanted to build and own some wagons of my
own, so when I joined a society that did not conduct public running
that
desire had to be turned into a reality. My original idea was
to
build some simple wagons that could carry all the tools, cameras, lunch
boxes, etc. that always accompany me when running the Feldbahn but when
I saw this narrow gauge guards van at the Hollycombe Steam Museum I
changed my plans.
Due to the problems of fitting the
Feldbahn and its driving truck plus a wagon into my car I had already
decided that any wagon would have to have a lightweight chassis with
removable flat panels so that the parts could be fitted around the
engine and truck already in the car. I reckoned that a guards
van
would only have one more panel than a simple wagon and that although
they would be taller the panels would still fit into the car,
so
the guards van was sketched out using my CAD program. If you
have
looked at my webpage about the Hymek diesel you may have noticed that
I already owned a wagon that was used with it but I was
convinced that
a much lighter chassis was now required. That wagon used a
Ride
on Railways 7 1/4" gauge driving truck chassis but the chassis and
wheels alone were almost a two man lift.
|
 I
already owned a pair of lightweight chassis side rails and several sets
of suitable, but too heavy, wheels so I machined out the inner
faces of
four wheels to make them very much lighter. The wheel discs
ended
up just 3mm thick but that is more than enough for the weight of the
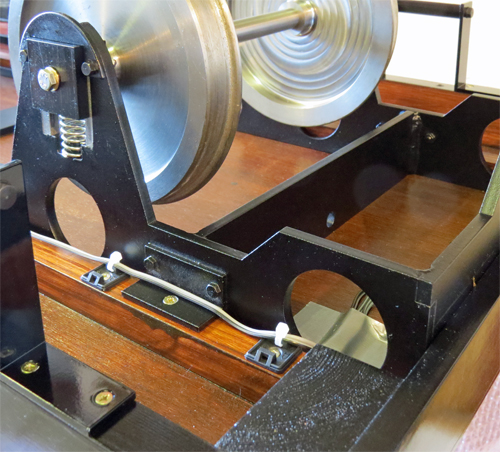
guards van and its intended load. The photo shows how the
chassis rails had been laser cut with lots of holes to save weight and
you can also see the wooden frame that forms the base of the guards van
which uses a sheet of 4mm thick Birch plywood for the main deck.
The entire chassis complete with the wooden deck and wheels
is an
easy lift for a single hand so my light weight target was certainly
achieved. I
already owned a pair of lightweight chassis side rails and several sets
of suitable, but too heavy, wheels so I machined out the inner
faces of
four wheels to make them very much lighter. The wheel discs
ended
up just 3mm thick but that is more than enough for the weight of the
guards van and its intended load. The photo shows how the
chassis rails had been laser cut with lots of holes to save weight and
you can also see the wooden frame that forms the base of the guards van
which uses a sheet of 4mm thick Birch plywood for the main deck.
The entire chassis complete with the wooden deck and wheels
is an
easy lift for a single hand so my light weight target was certainly
achieved.
I
also chose to use simple plain axle bearings because they would only be
lightly loaded, so the axle boxes were machined from scrap Delrin bar.
Being very easy to machine all four axle boxes were completed
in
a single morning. Another possibly unusual choice was my
decision
to make each axle in three parts. The centre main axle
section
has its ends turned down to fit into the wheels with the machined
sections not quite reaching all the way through the wheels.
Each
stub axle has a large diameter section that butts against the outer
wheel face to act as a spacer between the wheel and the axle box while
a short turned section locates the stub axle into the wheel.
An
M6 bolt goes through the stub axle and tightens into the end of the
main axle. The advantage of this arrangement is that the
shorter
lengths of the parts meant that they would fit my small lathe and that
the stub axles can easily be replaced if they do eventually wear.
Whilst the arrangement probably isn't suitable for high loads
it's more than adequate for the guards van.
With
the chassis almost complete the last parts to be specified were the
suspension springs. Ride comfort obviously wasn't a priority
but
keeping the guards van on the rails is critical so the springs have to
allow the wheels to follow any undulations in the track. With
soft springs on a lightweight wagon like this guards van it's very easy
to end up with something that rocks and rolls about, especially as a
high percentage of the weight is quite high up, and a wobbly wagon is
more likely to derail. The solution that I use on all my
rolling
stock (including my driving truck) is to select springs that are almost
fully compressed under the normal load. With little, if any,
more
compression available the wagon (or whatever) can't wobble about and
every wheel has the maximum possible pressure available from its spring
to force the wheel onto the track over any undulations.
Thankfully the spring suppliers that I use all have websites
with
programs on them that let you enter the spring details you know,
diameter, free length, load etc. to produce a list of suitable springs.
For the guards van and pipe wagon this let me purchase the
perfect spring without any need to experiment with different ones.
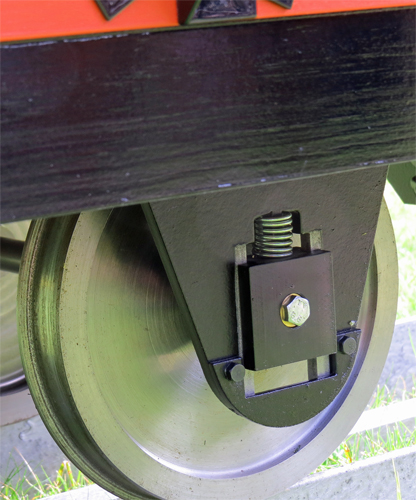
In the photo on the right you can see that the suspension
spring
is almost fully compressed under the normal weight of the guards van
and its load with 8mm of downwards wheel travel available.
|
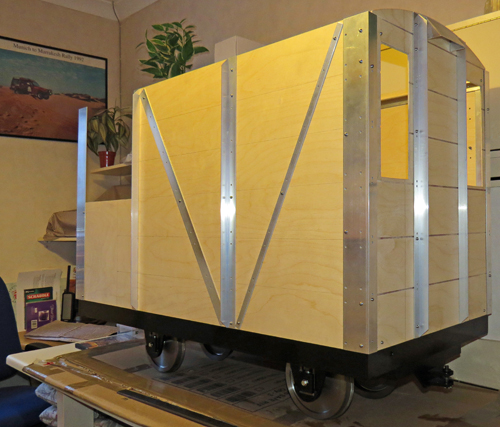 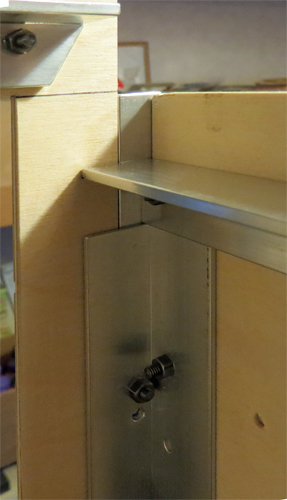 To
keep the guards van light the body panels were all made from 4 mm Birch
plywood with 16 swg aluminium angle and strip for the frames and
detailing. All the panels were routed through their outer ply
layer to give the appearance of a planked construction and everything
was held together with "no slot" steel roundhead 5BA screws to give the
appearance of coach bolts. Additional aluminium angles were
used
on the inside faces of the side panels to create slots in which the
transverse body panels could slide. The photo on the right
shows
the front face of the van being slid into a side panel, and small
brackets were later added so that just four 2BA screws would
lock
the top aluminium angles together thus allowing for very easy assembly
and dismantling. To
keep the guards van light the body panels were all made from 4 mm Birch
plywood with 16 swg aluminium angle and strip for the frames and
detailing. All the panels were routed through their outer ply
layer to give the appearance of a planked construction and everything
was held together with "no slot" steel roundhead 5BA screws to give the
appearance of coach bolts. Additional aluminium angles were
used
on the inside faces of the side panels to create slots in which the
transverse body panels could slide. The photo on the right
shows
the front face of the van being slid into a side panel, and small
brackets were later added so that just four 2BA screws would
lock
the top aluminium angles together thus allowing for very easy assembly
and dismantling.
As this guards van was never intended to be
a scale model I took liberties in reducing the number of planks that
were routed, and hence the number of screws (coach bolts) needed to
assemble it. Even so there were over 250 sets of holes to be
drilled but that seemed better than the 600 plus if I had used narrow
"plank" widths.
|
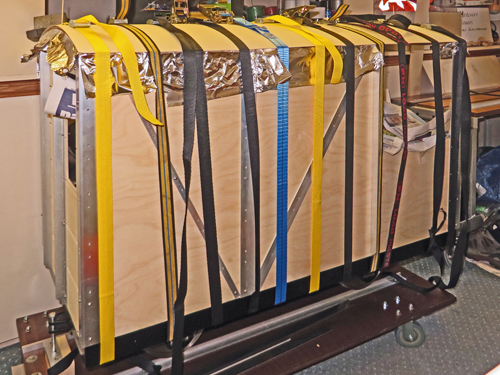 The
removable roof used three 12mm Birch plywood cross braces cut with the
required top curve with five longitudinal beams made from triangular
section softwood mouldings. These beams were set into the
cross
braces so that the widest face aligned with the curve of the roof and
glued into place. Once the glue was set the top edges of the
assembled guards van body were then lined with aluminium cooking foil
to
stop any stray glue sticking the roof to the body panels and the 1/6"
thick Birch plywood roof panel was glued in place using slow drying
epoxy adhesive and a lot of luggage straps to hold the plywood sheet
against the roof sub structure. Whilst I normally use
waterproof
PVA adhesives for assembling wooden components the slow curing epoxy
adhesive was used here for two reasons. First it
allowed
sufficient time to apply the glue, but more importantly it is also
thick enough to fill any small gaps that may have existed between the
roof substructure and the roof sheet. The
removable roof used three 12mm Birch plywood cross braces cut with the
required top curve with five longitudinal beams made from triangular
section softwood mouldings. These beams were set into the
cross
braces so that the widest face aligned with the curve of the roof and
glued into place. Once the glue was set the top edges of the
assembled guards van body were then lined with aluminium cooking foil
to
stop any stray glue sticking the roof to the body panels and the 1/6"
thick Birch plywood roof panel was glued in place using slow drying
epoxy adhesive and a lot of luggage straps to hold the plywood sheet
against the roof sub structure. Whilst I normally use
waterproof
PVA adhesives for assembling wooden components the slow curing epoxy
adhesive was used here for two reasons. First it
allowed
sufficient time to apply the glue, but more importantly it is also
thick enough to fill any small gaps that may have existed between the
roof substructure and the roof sheet.
|
 All
the finished external aluminium components were sprayed with etch
primer (ACID 8 is my preferred aerosol paint) and then finished with
gloss black using normal Halfords aerosol paint. The wooden
roof
assembly was given four coats of Ronseal Walnut (a suitable very dark
colour) quick drying varnish before the outside was sprayed using matt
black aerosol paint. The advantage of the Ronseal varnish is
that
with its one hour drying time you can easily apply and rub down four
coats in a single day to speed up the painting process. The
plywood panels were all painted using Johnstone's Universal Red Oxide
primer. It was the first time that I had used this paint and
I
was amazed by its quality. It brushed on easily and any brush
marks quickly disappeared, but best of all it created a nice smooth
thick layer of paint in only one coat. A quick rub down of
that
single coat was all that was required before the top coat of red oxide
could be applied. This was by far the best wood primer that I
have ever used. Once the top coat had dried the window and
door
frames were masked up and spray painted gloss white. All of
the
steel "coach bolts" were treated using Metal Blacking solution to avoid
the need for painting them. All
the finished external aluminium components were sprayed with etch
primer (ACID 8 is my preferred aerosol paint) and then finished with
gloss black using normal Halfords aerosol paint. The wooden
roof
assembly was given four coats of Ronseal Walnut (a suitable very dark
colour) quick drying varnish before the outside was sprayed using matt
black aerosol paint. The advantage of the Ronseal varnish is
that
with its one hour drying time you can easily apply and rub down four
coats in a single day to speed up the painting process. The
plywood panels were all painted using Johnstone's Universal Red Oxide
primer. It was the first time that I had used this paint and
I
was amazed by its quality. It brushed on easily and any brush
marks quickly disappeared, but best of all it created a nice smooth
thick layer of paint in only one coat. A quick rub down of
that
single coat was all that was required before the top coat of red oxide
could be applied. This was by far the best wood primer that I
have ever used. Once the top coat had dried the window and
door
frames were masked up and spray painted gloss white. All of
the
steel "coach bolts" were treated using Metal Blacking solution to avoid
the need for painting them.
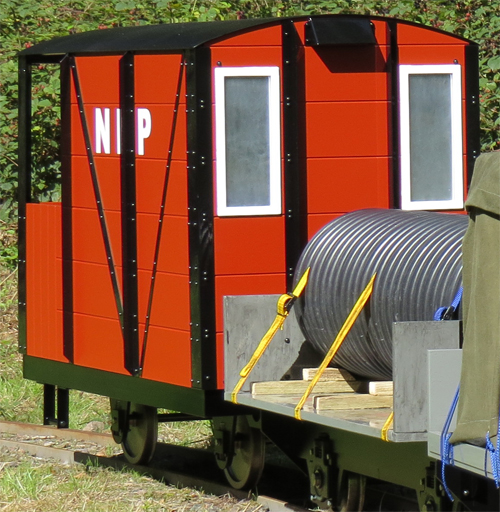
The
windows were cut from mirrored finish acrylic sheet and are all held in
place by the internal aluminium framing with some silicone rubber
sealant applied to stop them rattling in their frames. I used
the
same technique as on my Hymek locomotive of lightly rubbing the
outer (non mirrored) surface of the acrylic with very fine wire wool to
remove the normal "vivid" reflections that mirrors provide. I
find
that this produces a dull mirror effect that looks far more like the
reflections you get from normal glass windows.
The photo
also shows the pipe wagon which was very quickly built onto
the
chassis of the Hymek's match wagon that was no longer required after
the Hymek had been sold. The chassis was originally from a
Ride
on Railways 7 1/4" gauge driving truck so all I needed to do was add
three pieces of 12mm Birch plywood and four sections of 19mm mild steel
angle to create a flat bed wagon. The pipe load is held down
by
19mm ratchet straps (which proved difficult to source) and can be
fitted with a saddle to allow a single passenger to ride along on the
train. Since the whole wagon was built from "stuff" I already
owned in under a day it proved to be a quick, cheap, and very useful
addition to my stock.
|
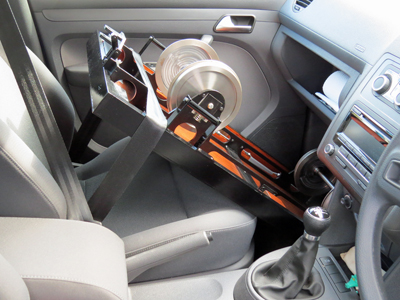 And
finally here's a photo showing how the guards van chassis travels in
the front passenger space of my car. Thankfully my ideas
proved
correct and all the guards van panels and roof fitted into the back of
the car around the Feldbahn and driving truck. Sadly there is
no
way to carry the pipe wagon at the same time but hopefully that will
eventually live at the Andover track. And
finally here's a photo showing how the guards van chassis travels in
the front passenger space of my car. Thankfully my ideas
proved
correct and all the guards van panels and roof fitted into the back of
the car around the Feldbahn and driving truck. Sadly there is
no
way to carry the pipe wagon at the same time but hopefully that will
eventually live at the Andover track.
You can see short video of the Feldbahn with these wagons by clicking
here.
|
| Postscript. |
| Since
writing this page my Feldbahn has been restyled to become a tender
locomotive (see the Cosmetic Modification pages) and that resulted in
me having another spare chassis. That has now been converted into
another wagon as explained below. |
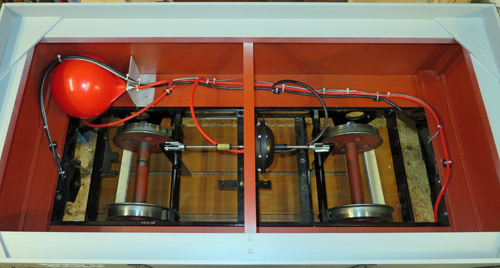 The
driving truck from my Feldbahn already had vacuum brakes fitted so
because this wagon was intended to carry a heavy stone load I decided
to retain the braking system. A pair of new operating arms were
installed so that the vacuum servo mounted directly onto them between
the axles. The orange sphere in the top right of the wagon body
is a 6" (150mm) diameter plastic ball cock float that acts as a vacuum
reservoir. These are very much cheaper than the reservoirs sold
for vacuum braking systems but work just as well. All you need to
do is drill a small hole right through the brass rod bush and fit a
suitable pipe adaptor. The
driving truck from my Feldbahn already had vacuum brakes fitted so
because this wagon was intended to carry a heavy stone load I decided
to retain the braking system. A pair of new operating arms were
installed so that the vacuum servo mounted directly onto them between
the axles. The orange sphere in the top right of the wagon body
is a 6" (150mm) diameter plastic ball cock float that acts as a vacuum
reservoir. These are very much cheaper than the reservoirs sold
for vacuum braking systems but work just as well. All you need to
do is drill a small hole right through the brass rod bush and fit a
suitable pipe adaptor.
The vacuum piping and electric cables for
the train lighting system are all retained with cable clips and ties to
ensure that nothing can drop onto the moving parts or track.
|
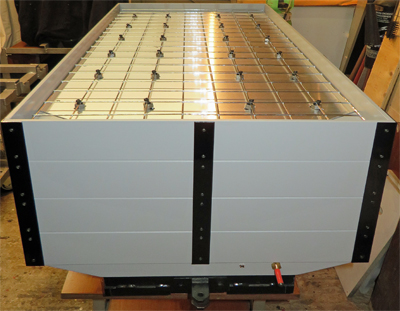 If
the wagon had simply been filled with stone chippings it would have
been very heavy (and a waste of chippings). But if only a thin
layer of chippings was used they could slide about on the false deck
and leave exposed areas of the deck in plain sight. My solution
was to fit a stiff wire grid cut from some fencing wire and spaced up
from the false deck using cable ties and M8 nuts. The stone
chippings were then held in place by the wire and the load appears to
be stable. If
the wagon had simply been filled with stone chippings it would have
been very heavy (and a waste of chippings). But if only a thin
layer of chippings was used they could slide about on the false deck
and leave exposed areas of the deck in plain sight. My solution
was to fit a stiff wire grid cut from some fencing wire and spaced up
from the false deck using cable ties and M8 nuts. The stone
chippings were then held in place by the wire and the load appears to
be stable. |
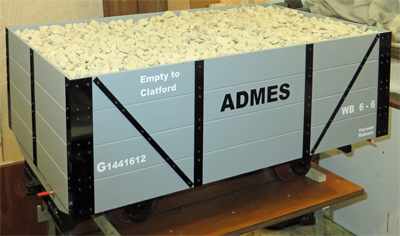 Here
is the finished wagon. The body was made from 6mm plywood, routed
to create the appearance of planks and the strakes are all aluminium
attached with black finish wood screws. With the addition of some
vinyl labels and the stone chipping load I think it makes a reasonable
narrow gauge wagon to go with my Feldbahn's other wagons. Here
is the finished wagon. The body was made from 6mm plywood, routed
to create the appearance of planks and the strakes are all aluminium
attached with black finish wood screws. With the addition of some
vinyl labels and the stone chipping load I think it makes a reasonable
narrow gauge wagon to go with my Feldbahn's other wagons. |